Right ingredient
She’s the curvy cook who had social media losing its collective minds over twice-buttered toast and her pronunciation of microwave (“mee-crow-wah-vey”) – but Cook, Eat, Repeat by Nigella Lawson has more to offer than that.
It’s been 22 years since British food writer Nigella Lawson published her first book How to Eat: The Pleasures and Principles of Good Food – and Cook, Eat, Repeat is her 14th. She’s recognisable the world over because of her many cooking programmes – Nigella Bites, Nigella Feasts, Nigella Christmas Kitchen. Like Jamie (Oliver) and Gordon (Ramsay) she has become someone who is recognised simply by her first name.
In her own words: “Food, for me, is a constant pleasure: I like to think greedily about it, reflect deeply on it, learn from it; it provides comfort, inspiration, meaning and beauty ... More than just a mantra, ‘Cook, eat, repeat’ is the story of my life.”
Again, she wrote introducing her new book on her website: “Subtitled ‘Ingredients, recipes and stories’ (and yes, I know that lovers of the Oxford comma might be a little perturbed here), it’s a book that’s very close to my heart. It focuses on the rhythms and rituals of the kitchen, most particularly my kitchen, and intertwines recipes with narrative essays about food and stories from a cooking life.”
“It’s a book that’s very close to my heart. It focuses on the rhythms and rituals of the kitchen, most particularly my kitchen”
This book is no mere laundry list of recipes. There is a constant narration and advice in written form – but anyone who has even watched her programmes will hear her voice ringing in their heads as they read.
“There are over 150 recipes, and many more delicious suggestions, that make the most of my favourite ingredients. Just to give you a taster, chapters include A is for Anchovy (a celebration of the bacon of the sea), Beetroot and Me, How to Invite People for Dinner without Hating Them (or Yourself), incorporating A Vegan Feast, a loving defence of Brown Food, and plenty of new ideas for Christmas.
“It’s so hard to pick out just a few recipes, but let me tell you some of my favourites that are in Cook, Eat, Repeat which are my Burnt Onion and Aubergine Dip, Wide Noodles with Lamb Shank in Aromatic Broth, Brown Butter Colcannon, Spaghetti with Chard, Chilli and Anchovies, Beef Cheeks with Port and Chestnuts, Butternut Squash with a Chilli Ginger and Beetroot Yogurt Sauce and - not forgetting the desserts – Rhubarb and Custard Trifle, Rice Pudding Cake, Chocolate Peanut Butter Cake and Cherry and Almond Crumble.


COMPETITION TERMS AND CONDITIONS
Competition submissions should reach us no later than 25th April 2021. The Prize/s is as indicated, no alternatives or cash will be provided. The decision of Integrated Media will be final, and no correspondence will be entered into. Under no circumstances shall Integrated Media, TOPS at SPAR, SPAR or its appointed representatives and the prize donors be liable to anyone who enters these Prize Draws for an indirect or consequential loss howsoever arising which may be suffered in relation to the Prize Draws. By entering these competitions, you make yourself subject to receiving promotional information. Entrants are deemed to have accepted these terms and conditions. Prize Draw Rules: The prize draw is only open to consumers who must be over 18 years of age and resident in South Africa. Employees of Integrated Media and TOPS at SPAR, SPAR and their respective advertising, media and PR agencies, as well as the family members, consultants, directors, associates and trading partners of such organisations and persons are ineligible for the draw. Participants can only win one competition every three issues.
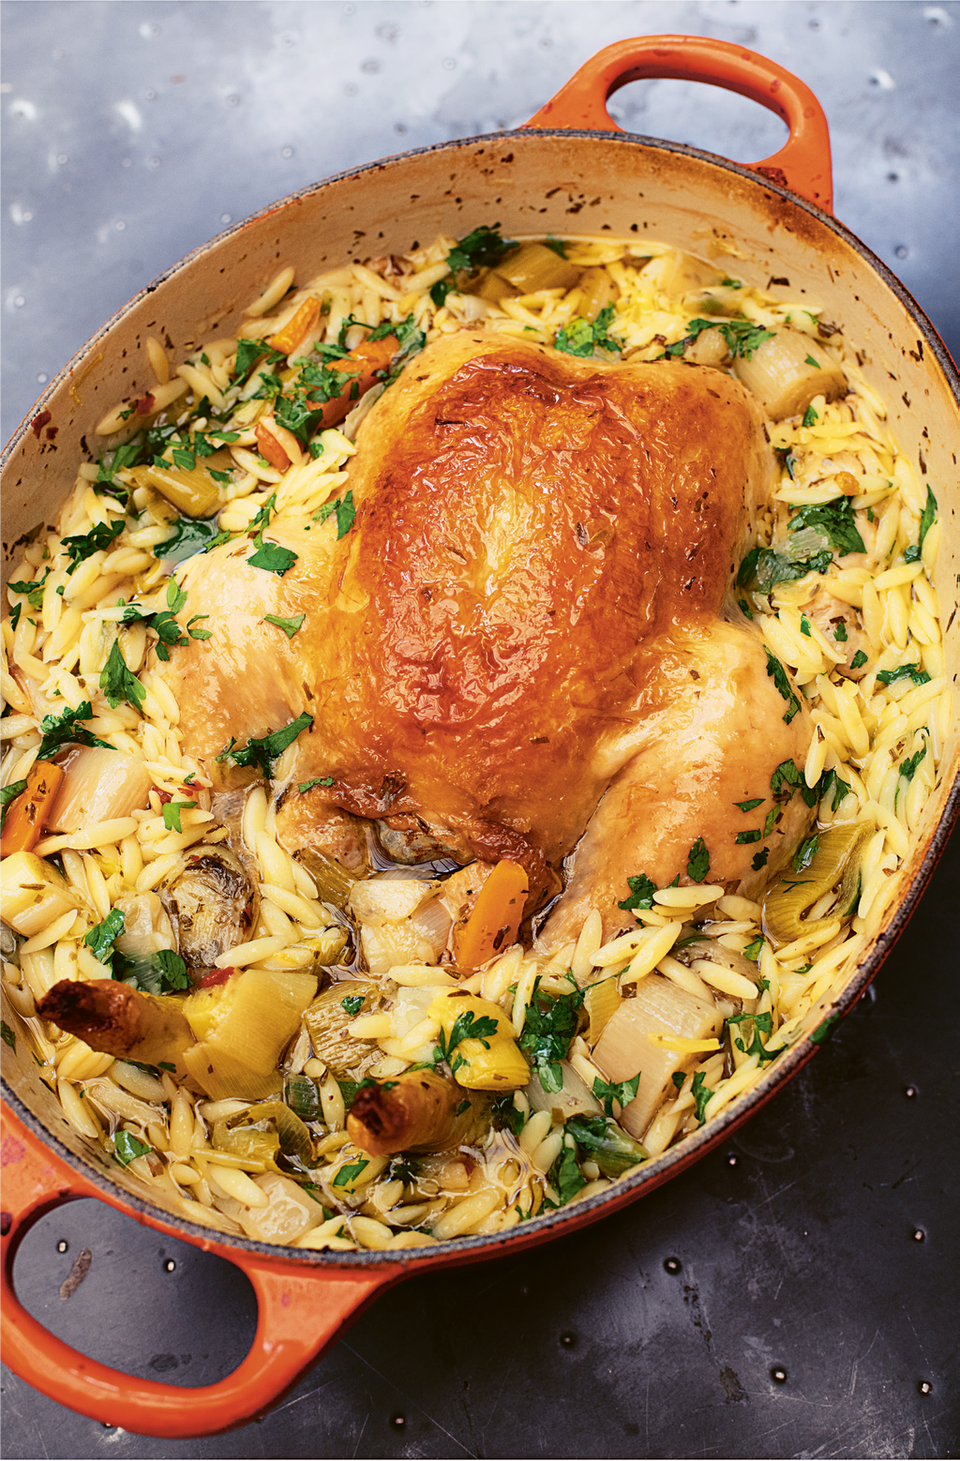
CHICKEN IN A POT WITH LEMON AND ORZO
This is not exactly the same as perhaps the most precious recipe in my repertoire, My Mother’s Praised Chicken, which found a home in my eighth book, Kitchen, but it owes a lot to it. A family favourite, it’s a simple one-pot dish which brings comfort and joy, and it is my pleasure to share that with you.
It’s not in the spirit of things to be utterly specific with this kind of cooking: if you’re feeding small children, for example, you may not want to add the chilli flakes. Similarly, you may want to use just one lemon, rather than the two I like. Your chicken may weigh more or less: the ones I get tend to be between 1.5kg and 1.7kg. And although I have specified the casserole I always use, you obviously will use the one you have, which will make a difference to how quickly everything cooks, how much evaporation there will be, and so on.
Don’t let these things trouble you unduly; this is a very forgiving dish. It doesn’t rely on precision timing: the chicken, leeks and carrots are meant to be soft, and I even like it when the orzo is cooked far beyond the timing specified on the packet. It’s also open to variation, owing to what’s in your kitchen.
You can, for example, replace the orzo with rice if you prefer, although you need to know that it will be slightly puddingy cooked this way; I don’t mean this disparagingly, but to indicate the soft, swollen texture. Barley works well, too, though will need to go in sooner, or you can use ditalini or any other small pasta you want. If you prefer to use dried thyme in place of the dried tarragon, by all means do; I also like it with dried mint. I could go on, but there is no need to add complications: this is a simple recipe that brings deep contentment.
SERVES 4–6
1 chicken (approx. 1.5kg)
3 fat cloves of garlic
2 medium carrots (approx. 300g)
2 medium leeks (approx. 400g trimmed weight, or approx. 600g if you’re buying them untrimmed)
1 x 15ml tablespoon olive oil
2 lemons
2 teaspoons dried tarragon (or dried thyme)
2 teaspoons sea salt flakes (or 1 teaspoon fine sea salt)
½ teaspoon dried chilli flakes
1.5 litres cold water
300g orzo pasta
6 x 15ml tablespoons finely chopped Flat-leaf parsley, plus more to serve Freshly grated Parmesan, to serve
1. Untruss the chicken, if it comes trussed, and remove all the string. If time allows, let it stand out on a board for 40 minutes or so to let the chill come off it. Heat the oven to 180˚C/160˚C Fan.
2. Peel the garlic cloves, and peel and cut the carrots into three lengths across, and then into batons. Wash the leeks to remove any mud, if needed, and cut into approx. 2 cm rounds.
3. Heat the oil in a large heavy-based casserole with a tightly fitting lid; I use an enamelled cast-iron oval casserole 29cm long, in which the chicken fits neatly, leaving just a small space all around it to fit the vegetables later. Place the chicken in the hot oil breast-side down to colour the skin; I do this over high heat for 3–5 minutes, or until the skin is richly golden. Then turn the chicken the right way up.
4. Take the pan off the heat and, aiming for the space around the chicken, finely grate in the zest from the two lemons, then grate or mince in the garlic (obviously some can end up on the chicken itself), add the dried tarragon (or thyme) and give a quick stir into the oil as best you can.
5. Scatter the vegetables around the chicken, followed by the salt and chilli flakes (if using), and squeeze in the juice from your zested lemons.
6. Pour in the cold water – covering all but the very top of the breast – and put back on high heat, then bring the pot to a boil. Once it’s bubbling, clamp on the lid and carefully transfer to the oven to cook for one hour 15 minutes, though check to make sure the chicken is all but cooked through and the carrots soft.
7. Take the pot out of the oven, and add the orzo all around the chicken, and push it under the liquid, giving something as approximating a stir as you can manage in the restricted space. Put the lid back on, and return the casserole to the oven for another 15 minutes, by which time the orzo should be soft and swollen.
8. Let the casserole stand, uncovered, out of the oven for 15 minutes before serving. The orzo will continue to soak up the broth as it stands.
9. While you’re waiting, chop the parsley. Stir in 4 tablespoons, and then sprinkle over a little more. You could shred the chicken now, but it looks so wonderful in its pot I like to bring it to the table whole.
10. Place a dish by the casserole, and then pull the chicken gently apart with a couple of forks, removing any bones and skin that come loose to the dish. (For me, these bits are a particular treat: I live for the cartilage.) I find it easiest to do this while the chicken’s still in the pot but, if you prefer, you can try and remove it to a carving board; go carefully as it’s likely to fall to pieces a bit as you do so. Stir the chicken and orzo again and ladle into bowls, sprinkling with parsley as you go. You may also want to offer parmesan to grate over: I prefer it without, but there is a strong pro-parmesan contingent in my house.
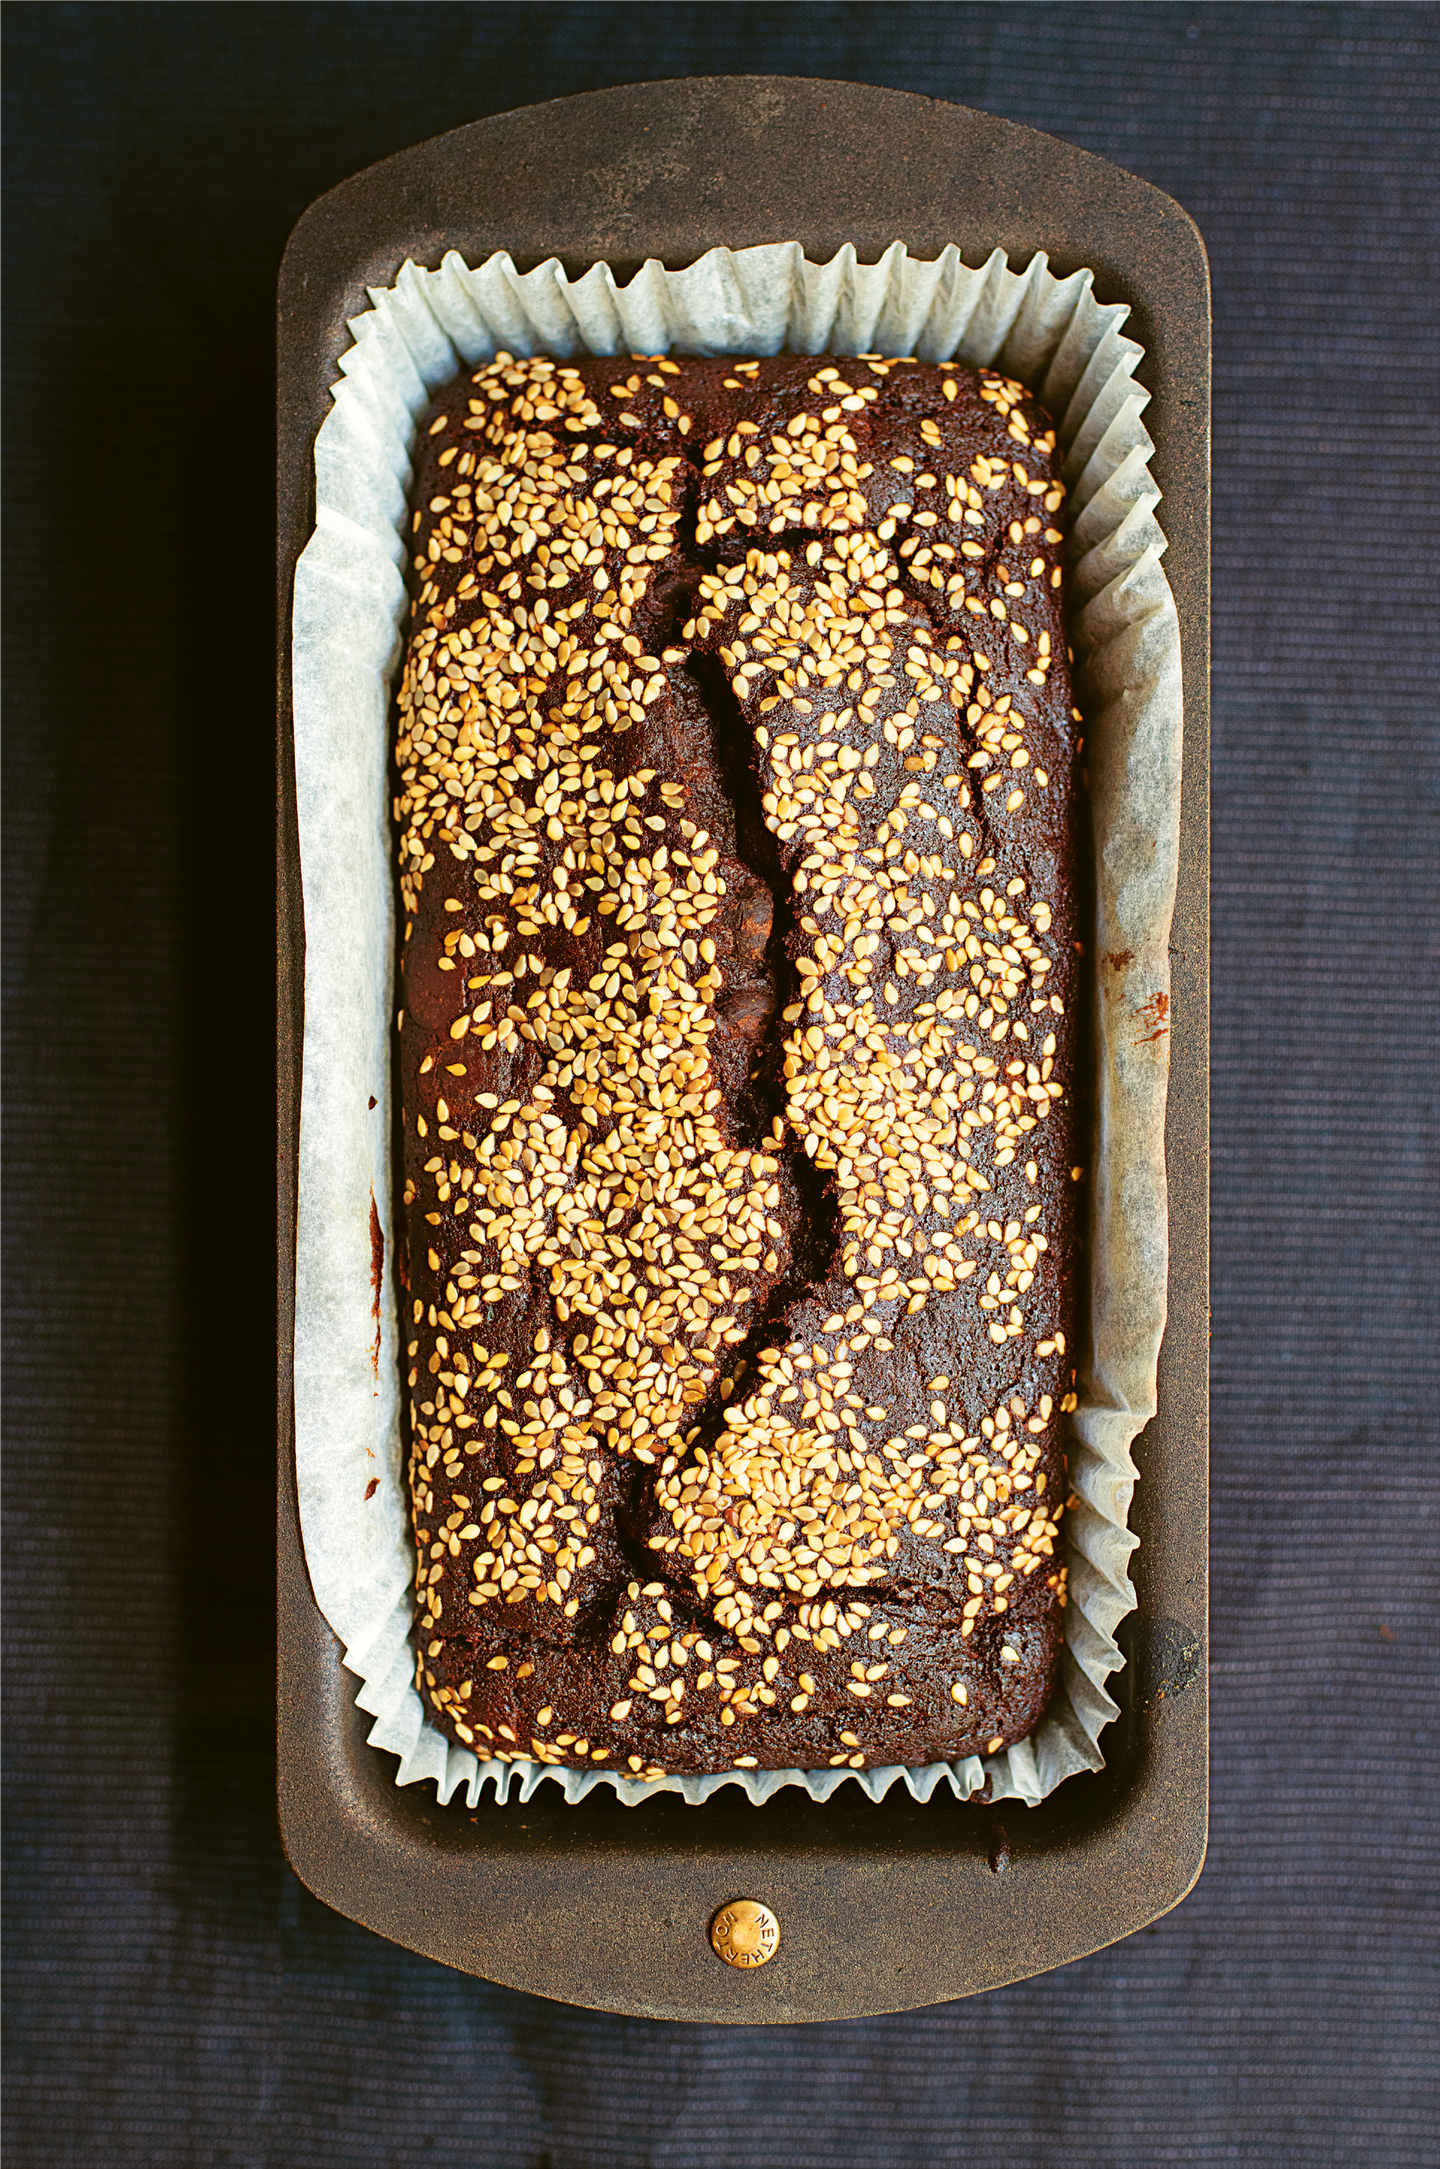
CHOCOLATE, TAHINI AND BANANA TWO WAYS
I have been making a banana bread with chocolate and tahini on repeat for a while now, and every time I’ve eaten it over the last year or so, I couldn’t help thinking that the particular combination of intense chocolatiness, sweet, texture-softening banana and the rich earthiness of tahini would make the perfect warm pudding. Finally, I tried it out. And much as I adore the elegant subtlety of the banana bread, I was enraptured by it in pudding form. A warm, soft and squidgy cake, it is both embracingly cosy and almost regally sumptuous.
You could serve it just with crème fraîche, a little bit of tang to offset the pudding-cake’s richness, but I stir 4 teaspoons of tahini into 250ml of double cream and whisk gently by hand and for not very long, until it’s softly whipped.
And I don’t stop there: after I’ve dolloped the tahini cream onto my pud, I drizzle over some (shop-bought, not homemade) date molasses, which is like sticky toffee pudding in syrup form.
Whether you’re making the delectable banana bread or the pudding-cake (and, for that matter, any recipe in this book that has tahini in it) do try and get proper Middle Eastern tahini, which is smokier and more fluid, with a full-bodied velvetiness, than the more widely available Mediterranean one on which I have bent more spoons than Uri Geller.
You can easily double the quantities below to fill a 2lb (900g) loaf tin or 23cm round pie dish, depending on whether you’re making bread or pud; in either case, I don’t find it makes an appreciable difference to the cooking time. You can make a vegan version of both, omitting the egg, and upping the bananas to 350g and the tahini to 75g. For the pudding, you will need to add 50g of plant-based yogurt, too; I used the same almond-soy variety as I do for the Vegan Lemon Polenta Cake. Neither the pudding nor the bread will rise a lot without the egg, but the taste is still magnificent. Dark chocolate chips should be dairy-free, but do check the packet.
GIVES approx. 10 slices of banana bread or makes a pudding for 2–3
250g (approx. 2 medium) very ripe or overripe bananas (skin-on weight)
60ml olive or vegetable oil
50g tahini, at room temperature (and see recipe intro)
50g full-fat double cream yogurt, at room temperature (but only for the pud)
1 large egg, at room temperature
50g castor sugar
50g soft dark brown sugar for the pud;
35g for the bread
1 teaspoon vanilla extract
60g plain flour (or gluten-free plain flour)
25g cocoa
½ teaspoon bicarbonate of soda
¼ teaspoon fine sea salt
100g dark chocolate chips
1½ teaspoons sesame seeds, to sprinkle on top (only for the bread)
1. Heat the oven to 170°C/150°C Fan if you’re making banana bread, or 180ºC/160ºC Fan for the pudding. Put a paper liner into a 1lb (450g) loaf tin or, for the pudding, get out an ovenproof dish with a capacity of about 750ml; mine is 18cm in diameter and 5cm deep.
2. Peel the bananas and, either by hand or using an electric mixer, mash the bananas, then beat in the oil. I use an American ¼ cup (60ml) measure to do this, and then fill it up with tahini (conveniently, 60ml of tahini weighs 50g) and beat that in. If you’re making the pudding, beat in the yogurt (you can also fill the ¼ cup measure with it to get 50g). Whether you’re making the pudding or the bread, now’s the time to beat in the egg, then the sugars and vanilla.
3. Whisk or fork together the flour, cocoa, bicarb and salt and slowly beat into the batter and when you can no longer see any specks of white, fold in the chocolate chips with a bendy spatula, which you will need to scrape the runny batter into either loaf tin or ovenproof dish. If it’s banana bread you’re making, sprinkle over the sesame seeds.
4. First, instructions for the bread: cook for 45–50 minutes until risen and firm to the touch, or until a cake tester comes out almost clean; some chocolate chips will make it a little sticky in parts. And don’t worry about the cracks on the top; that is part of its deal, as it is for the pudding. Let it cool completely in its tin on a wire rack and – if you can bear to wait – once it’s cold, slip it out of the tin and wrap it in baking parchment, then foil, and leave it for a day before slicing and eating. I understand if this is too much to ask; I confess I don’t always manage to wait.
5. And now for the pudding-cake: cook for 40–45 minutes, depending on whether you want it to have a gooey molten centre or not. Once it’s out of the oven, let it stand for 5–10 minutes before diving in for that first squidgy spoonful.
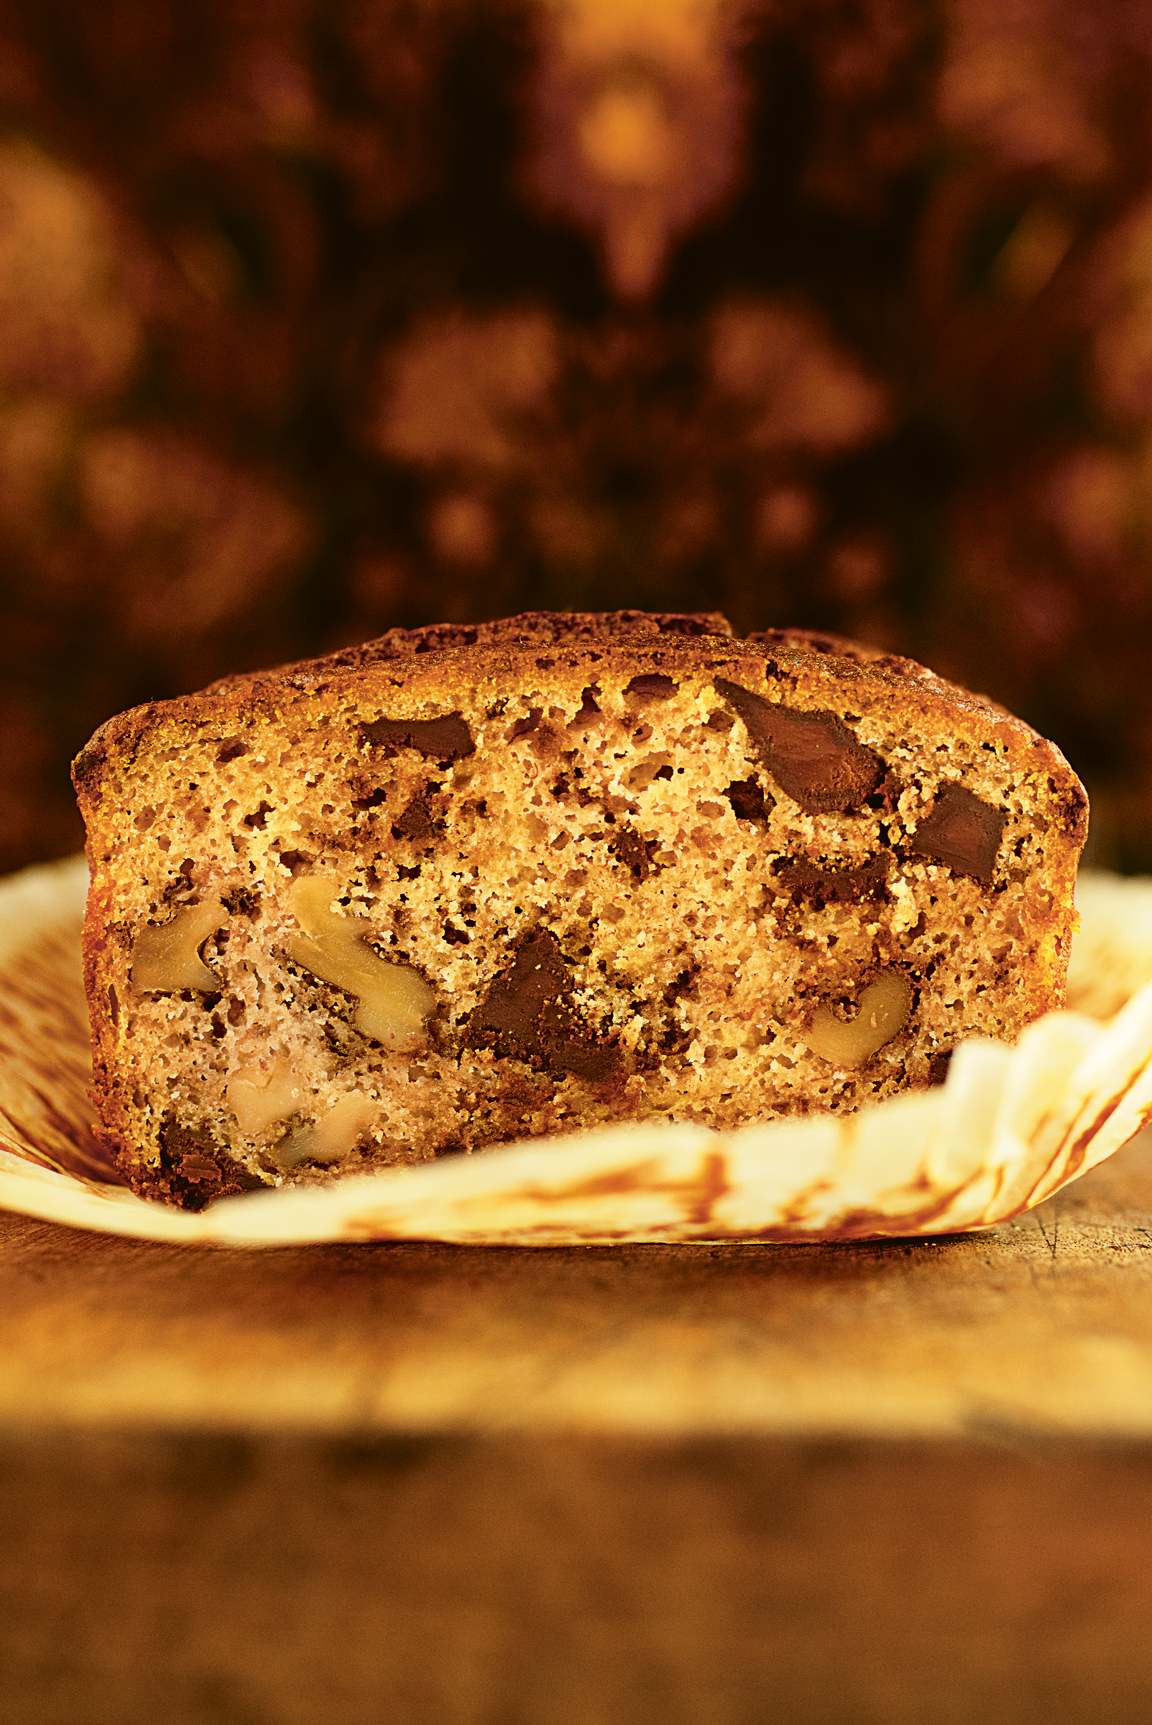
GLUTEN-FREE BANANA BREAD WITH CHOCOLATE AND WALNUTS
Since I am clearly incapable of throwing away even the blackest banana, I have spent much of my life making banana bread, and am always happy to find an excuse to come up with another one. A friend of mine had been begging me for ages for a gluten-free version, and this is it. The crumb is tender and light – the double cream yogurt helps here, and also counters the sweetness of the banana with its tang – and the nubbliness of the walnuts and rich goo of the chopped chocolate make it a gorgeous treat. I can’t stop eating it.
I’ve said to chop both walnuts and chocolate roughly: although you will of course get some shards and rubble, I keep most pieces chunky enough to make their presence proudly felt in each sumptuous bite. You can halve quantities to fill a 1lb (450g) loaf tin; I don’t find it takes appreciably less time to cook.
GIVES 10–12 slices
175g rice flour (or gluten-free plain flour)
100g ground almonds
2 teaspoons gluten-free baking powder
½ teaspoon bicarbonate of soda
¼ teaspoon fine sea salt
500g (approx. 3 large) very ripe or overripe bananas (skin-on weight)
2 teaspoons vanilla extract
100g full-fat double cream yogurt, at room temperature
2 large eggs, at room temperature
125ml vegetable oil
125g soft light brown sugar
150g dark chocolate, roughly chopped
100g walnuts, roughly chopped
1. Heat the oven to 170°C/150°C Fan and drop a paper liner into a 2lb (900g) loaf tin or line the base with baking parchment.
2. Mix the rice flour (or gluten-free plain flour), ground almonds, baking powder, bicarb and salt in a bowl. Set aside for now.
3. Peel the bananas and, in a large bowl, big enough to take all the ingredients later, mash the peeled bananas thoroughly. Beat in the vanilla, then the yogurt and, one by one, the eggs, followed by the oil and sugar.
4. When everything’s combined, gradually beat in the flour mixture. Scrape down the sides of the bowl to make sure all is combined, and then fold in the chopped chocolate and walnuts.
5. Pour and scrape the batter into the lined loaf tin – it will come close to the top – then bake in the oven for 50–55 minutes until shrinking from the sides of the tin, and a cake tester (if you manage to avoid the gooey chocolate) comes out cleanish but with a few damp crumbs sticking to it. Sit the tin on a wire rack, and allow the cake to cool completely before removing from the tin.
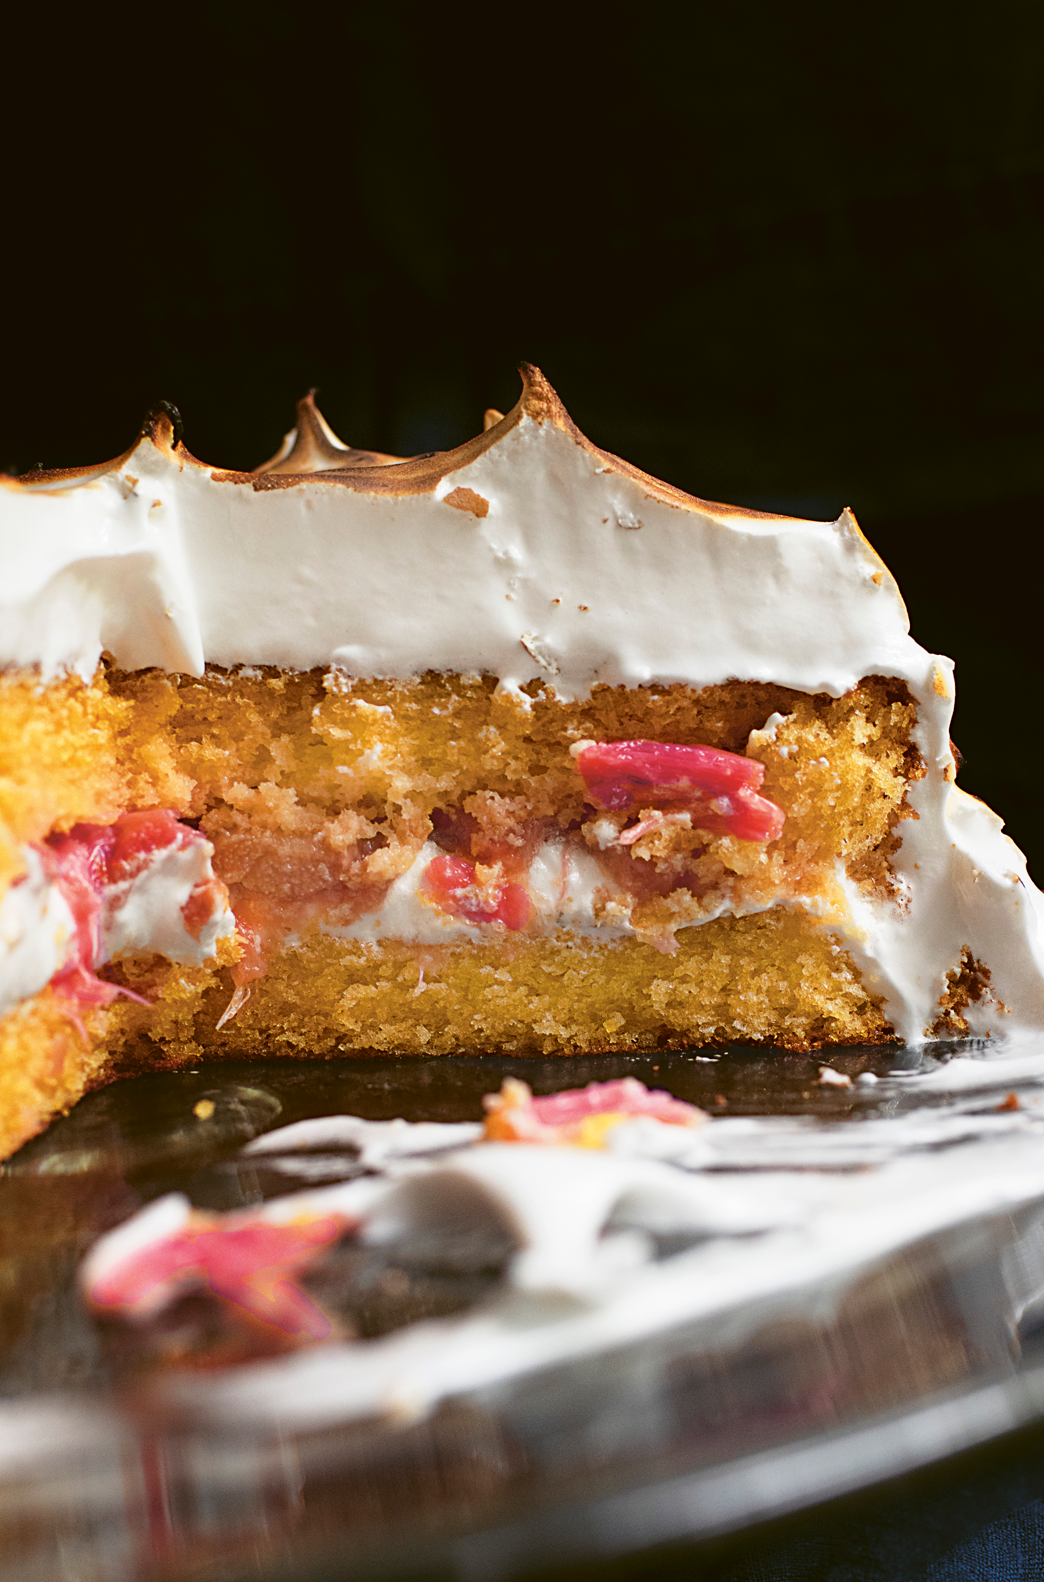
TOASTED MARSHMALLOW AND RHUBARB CAKE
This is a relatively new addition to my rhubarb repertoire, but it has been heavily in rotation ever since I first made it nearly two years ago. Anyone who has a birthday when the forced pink rhubarb is in season gets it (and I do even have alternatives for those dim days when it isn’t, and I’ll get to them later). It is splendidly celebratory, but not dauntingly difficult. You need a bit of elbow grease and a blowtorch; I can’t tell you how much I enjoy teasing out the snowy spikes of marshmallow-meringue and then scorching them. Actually, I positively exult in it: the very act of making this feels like a jubilant part of the celebration itself. And I thank cake consigliere Stella Parks, who, in the pages of her compendious BraveTart: Iconic American Desserts, provided the hand-holding inspiration for the marshmallow icing.
You do need to be prepared to whisk the whites until truly thick, but if you have a mixer, this does most of the work. The yolks are used to make two tender and celestially light golden sponges, and the rhubarb that goes between them provides its emphatic tang, offsetting the intense sweetness of the marshmallow icing. Out of forced-rhubarb season, I favour a mixture of raspberries and redcurrants: 300g of the former and 100g of the latter. I put them into a small saucepan with 1 tablespoon each of castor sugar, undiluted elderflower cordial and water, and warm them over low heat with a lid on for 3 minutes, or until the juices start to run, then give them 2 minutes with the lid off, before transferring them to a dish to cool. If you want to use just raspberries, straight from a punnet, uncooked, you may, and you won’t need many, but you should mash some with a fork – leaving a generous handful whole – before topping the marshmallow layer that sandwiches the cake with them. When I make the original rhubarb version, I like to bring a bowl of roast rhubarb or rhubarb compote, however you like to think of it, to the table for people to spoon onto their cake plate, but I don’t regard it as obligatory; when I do the raspberry version, I regard extra berries on serving as non-negotiable.
While I have made the cake in its entirety the evening before when there has been no alternative, I prefer not to. The icing certainly keeps the cake airtight, but the potential for drippage and slippage overnight is just too tense-making. I haven’t had any disasters yet, but feel it’s only fair to warn you that it is a risk. The cakes, on their own, if made in advance will become both too dry and too frangible.
One last – important – comment: since you will be blowtorching this cake, it is imperative that the cake stand you put it on is heatproof.
GIVES 8–12 slices
FOR THE RHUBARB LAYER
400g pink forced rhubarb (trimmed weight)
100g castor sugar
FOR THE CAKE
6 large eggs, at room temperature
1 lemon
100ml full-fat milk, at room temperature
25g corn flour
100g plain flour
2 teaspoons baking powder
½ teaspoon bicarbonate of soda
¼ teaspoon fine sea salt
150g castor sugar
150ml vegetable oil, plus more for greasing
FOR THE ICING
6 egg whites, from eggs above
350g castor sugar
¼ teaspoon fine sea salt
½ teaspoon cream of tartar or ½ teaspoon lemon juice
2 teaspoons vanilla extract
1. Start by cooking the rhubarb. Heat the oven to 200°C/180˚C Fan. Cut the trimmed rhubarb ribs into 5cm lengths if slender, 2cm if chunky. Put into an ovenproof dish in which they will be able more or less to sit in a single layer – I use a 20 x 26cm Pyrex dish – and sprinkle over the 100g of sugar. Mix together with your hands, leaving the rhubarb in a single layer, as much as possible, then cover the dish with foil, sealing the edges well, and cook in the oven for approx.
30 minutes until the rhubarb is tender, but still holding its shape.
2. Remove the foil, and leave the dish of rhubarb out on the counter, watching it glow ever more pink as it cools. Turn the oven down to 170°C/150˚C Fan. Line the bottoms of two 20cm loose-bottomed sandwich tins, and lightly grease the sides.
3. Separate the eggs, dropping the whites into a large mixing bowl or bowl of a freestanding mixer (whichever bowl you’re using should be thoroughly washed and grease-free) and the yolks into another. Cover the bowl of whites with food wrap, and put to one side while you mix and bake the cake.
4. Finely grate the zest of the lemon and add to the bowl of yolks. Measure out the milk, juice the lemon and add 2 tablespoons of juice to the milk, and leave to stand for a mo. Mix together the corn flour, flour, baking powder, bicarbonate of soda and salt, and set this aside for now, too.
5. Add the 150g of sugar and the oil to the yolks and whisk on medium-high speed for 3 minutes, by which time the mixture will be rich, gleaming and billowy. Actually, it looks rather like a glorious mayonnaise.
6. Still whisking, but slightly more slowly now, gently pour and scrape in the now curdled milk and, once it’s in, carry on whisking until combined; the mixture looks like custard at this stage. Finally, whisking more gently now, gradually spoon in the dry ingredients. Once in, use a spatula to scrape down the sides, and fold everything gently together, before dividing the airy mixture between the prepared tins.
7. Bake for 20–25 minutes, by which time the cakes will have risen up extravagantly, the tops a golden brown; they will feel soft and puffy to the touch, but a cake tester should come out clean. Remove to a wire rack and let the cakes cool in their tins for 15 minutes – sinking a little as they do so – before very carefully turning out. You’ll need to loosen the edges with a small offset spatula first. These are tender sponges, so don’t rush or be rough. Once unmoulded, gently pull back and remove the lining papers straightaway.
8. When the cakes are completely, completely cold – which will take about an hour – you can get on with the icing. But first, tear off four strips of baking parchment, scrunch them, then unscrunch them and lay them flat to make the outline of a square on top of a cake stand. (This is to stop you covering the cake stand with sticky marshmallow icing later. It may sound a faff, but I wouldn’t advise you to leave out this step.) Place one of the cakes on it, top-side down, the paper strips under the edges. Also, now’s the time to lift the rhubarb pieces out of their syrup in the tin and on to a plate.
9. So, to the icing: get out a tall pan that you can sit your big bowl o’whites on (without the bottom of the bowl touching the water) and heat a little water in it until just about to come to a simmer. Mix the 350g of sugar, the salt and the cream of tartar (or lemon juice) together and add to the egg whites. Then sit the mixing bowl on top of the pan, so it’s gently warmed by the barely simmering water underneath and, just using a balloon whisk (thoroughly washed and grease-free, again), keep whisking for 3 minutes, to dissolve the sugar. I couldn’t say this is hard to do, but you can really feel it in your forearm. I’m always grateful when my 3-minute timer goes off.
10. Once the sugar’s dissolved and you have a smooth opaque mixture that’s warm to the touch, remove the bowl from the saucepan. Whisk at high speed for 5 minutes in a freestanding mixer, or for 6–7 minutes if using an electric handheld whisk, by which time the whites will be very, very thick and ludicrously voluminous. Whisk in 1 teaspoon of the vanilla extract, and when it’s incorporated, whisk in the remaining teaspoon, then give a good fold by hand to make sure every bit is mixed in.
11. Dollop a generous amount of marshmallow icing on to the waiting cake, and smooth right to the edges, so that you have a layer about 1cm thick: this should use about a quarter of the icing. Cover this with the rhubarb, though leave about ½ cm perimeter around the edge; I go slowly here, using a couple of dessertspoons to ferry the rhubarb to the cake. And you might want to tilt the rhubarb plate away from you slightly as you transfer the slices, to make sure you leave any pooling liquid behind.
12. Top with the second cake, right way up, and use just under half the icing left in the bowl to cover the top, going just beyond the edges. Then carefully spread the rest of the icing thickly around the sides – leaving a tiny bit in the mixing bowl – until the whole cake is completely covered. Now for the really fun part: dip your fingers in the bit of icing left in the bowl and then dab the top and sides of the cake, lightly pulling up and teasing out spikes of marshmallow icing; I feel like an ’80s hairdresser doing this. Bear in mind that sometimes, as you do the sides, you will pull bits of the icing off, leaving a hole, but don’t panic, just pat it back on. Gently pull out the strips of paper from beneath the cake and discard, then seal the bottom of the cake with any remaining icing should you need to. Then, slightly dampen a piece of kitchen towel with cold water, and rub off any stray bits of icing or sugar smear from the plate.
13. Take the cake somewhere you can kindle fire safely. Light a blowtorch and, holding it fairly near the cake and with not too timorous a flame, toast the top and the sides of the icing.
14. I find this cake easiest to slice if left to stand for a couple of hours before serving. And you need to slice generously, as with all layer cakes.